• About

Reinventing Claire

~ with Passion & Purpose

Category Archives: Favorite Products

Beloved, Award-winning Toy

12 Wednesday Sep 2012

Posted by Claire Eddins in Family, Favorite Products, Kids, Lifestyle, Toys

≈ Leave a comment

Tags

animal puzzle, Award-winning toy, family activies, farm animals, favorite toy, gifts for kids, grandparents, kids games, kids puzzle, kids toys, Mix or Match, playthings, Popular Playthings, pre-schooler toy, puzzle, toddler toy, toy box, travel game, travel toy, vacation, vacation toy

As a mom with just one child, you could argue that I’m hardly uber-qualified to review toys. However, my secret weapon is the fact that I am also step-mom and step-grandmom to a goodly number of kids… So, I’ve experienced my share of kidstuff over the years.

With my husband’s grandchildren living just down the road, our goody-filled toy box helps keep my family ready for impromptu visits. Its been my job to make sure the box does not disappoint.

Last night, my husband’s grandson stayed over. Although granddaddy’s favorite little pre-schooler seems to have come from the womb totally obsessed with trucks, tractors and earth-moving equipment (both real and toy versions), last night we found him completely bewitched by the “Mix or Match” puzzle that he’d unearthed in the toy box.

The “Mix or Match” by Popular Playthings is both clever and simple to operate. Pull up the handle (which also ensures the toy puzzle is easily carried) to unlock ten rotating blocks on bars. Each rotating block’s four visible surfaces feature one of four different animals… cow, rooster, sheep and pig. By spinning or rotating each of the blocks, the puzzle idea is to coordinate the images on the blocks to come-up with a matched face. Once all the blocks match (ie, you have the complete face of the cow, for example) push the handle down to lock the face in place.

Even more fun than matching the blocks to create each animal face, is mix-matching the blocks to come-up with silly mix-matched faces that incorporate two or more of the different animals. For example, one might have a cow muzzle with pig eyes and lamb ears with a rooster chest.

Last evening, as I watched our little grandson working the gizmo over and over, grinning, laughing and calling for me to “Look!” at his wacky animal creations, I remembered how, a few years earlier, his older sister had succumbed to the spell of the marvelous “Mix or Match” when she was her brother’s age. Now a “big girl” in elementary school, she’s still smitten with it. And, I’ve caught my high-school-aged son fiddling with it too, but don’t tell him I told you so…

Five years ago, when I first purchased the “Mix or Match,” I hoped it would appeal to my husband’s then-pre-school aged granddaughter. In addition, I wanted an inexpensive plaything that was danger-free; easy to clean; virtually fail-safe to operate; packable in a backpack or tote; easy to carry and use in the car or during an outing; and capable of holding a child’s attention for more than 20 seconds. Whew! By anyone’s standards, it was a tall order to fill.

Regardless, I got all that and more with the “Mix or Match” animal farm puzzle. For about ten dollars (cheap by today’s standards), this Dr. Toy Best Children’s Vacation Product Award Winner is a great buy. And, if farm animals don’t make your kids smile, there is a zoo-animal version a well. Better still, after years of use at our house, in our cars, on the hammock, in the field, at the barn, and more, the puzzle still works. It still looks like new. And, it’s still beloved by kids of all ages!

All photos taken with an iPhone 4. ©2012 EddinsImages.

Rocker Redo with Annie Sloan Chalk Paint

08 Friday Jun 2012

Posted by Claire Eddins in Annie Sloan Chalk Paint, Craft, Decorative Painting, DIY, Favorite Products, Home Projects, iPhoneography, Lifestyle

≈ Leave a comment

Tags

Annie Sloan, Annie Sloan Chalk Paint, Annie Sloan Chalk Paint Color Card, Annie Sloan Chalk Paint Colors, Annie Sloan Chalk Paint Palette, Annie Sloan Cream, Annie Sloan Old White, Annie Sloan Versailles, ASCP, chalk paint, Color Card, craft paint, decorative paint, DIY, diy furniture paint, DIY furniture painting, girl's paint, Hand Painted Color Card, hand painted furniture, historic paint, home decorating, iPhone 4, low VOC paint, Paint, paint palette, painted furniture, painting vintage furniture, refinishing furniture, repainted furniture, rocking chair redo, vintage furniture

DIY home decorating project features vintage furniture painted with Annie Sloan Chalk Paint colors Old White, Cream and Versailles. © 2012 EddinsImages

After completing several DIY painted furniture projects, I’m kind of liking my Annie Sloan Chalk Paint. As Ms. Sloan promised during her visit to the east coast this spring, her low VOC paint does adhere to anything, and requires no primer or special prep. I like that. Also, it is quick drying and presents a “matte velvety” finish. Perfect for decorative painting projects, especially worn or old furniture that could use a facelift.

Annie Sloan Chalk Paint palette offered in the United States for 2012. I’ve fiddled with color settings a bit on my computer in an attempt to accurately replicate the color card in my hand on your computer screen. © 2012 EddinsImages

So far, my eight ASCP colors – out of 29 offered by Sloan today – are each quite conservative and light in tone. They are: Old White; Cream; Versailles; French Linen; Country Grey; Old Violet; Duck Egg and Louis Blue.

I need some more colors in my palette… more intense colors with punch! These are code words, off course, for: buy more paint! The only problem is, when I try to decide which two or three colors will come home next… immediately, my list grows to no less than eight different hues. Hummm. At close to $40 per quart, I’ll be giving some serious thought to my choices.

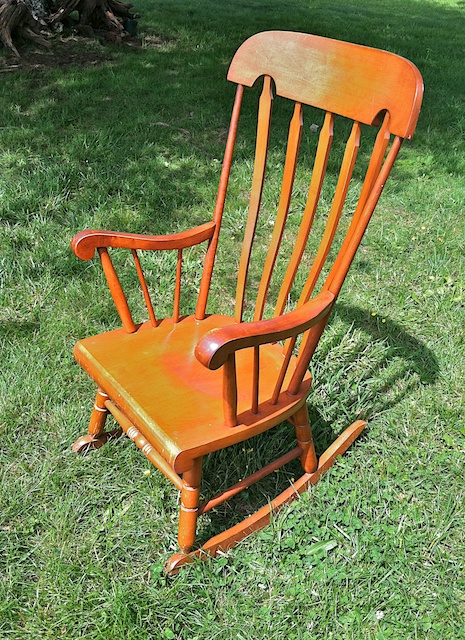
Grandma’s unpainted, solid wood rocking chair. © 2012 EddinsImages

Meanwhile, here are some photos of a rocking chair I repainted recently. My grandmother purchased the chair about 40 years ago for my brother’s bedroom in the family home on Cape Cod. The chair is quite comfortable, especially for a rocker. However, I am tired of the plain-jane stained wood, and my house today is littered with stained wood pieces. Something had to be transformed…

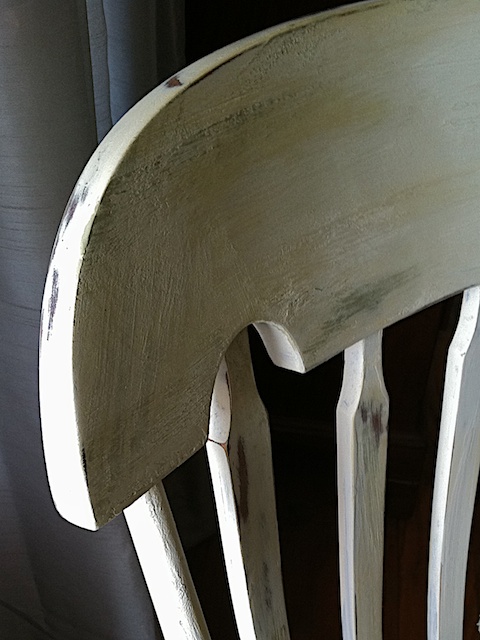
Closeup of my DIY project: the rocking chair repainted in layers with Annie Sloan Chalk Paint. I sanded in places to show the original wood finish. © 2012 EddinsImages

For the rocker, I used Old White, then layered and textured a bit with Cream and Versailles. Also, I sanded in places throughout the process to let the original wood show through. So far, I’ve not finished this piece with my final layer of wax, however, I plan to top it with Annie Sloan Soft Wax in Clear.

Rocking chair back painted at home with Annie Sloan Chalk Paint. © 2012 EddinsImages

All in all, the project took several hours… a solid half to three-quarters of a day, considering drying time between coats. I was going for a sort of worn, shabby chic, textured look that was light (but not white) and would work in a variety of decorating styles.

Close-up of rocking chair details: Annie Sloan Chalk Paint, layered, texturized and sanded with no wax applied. © 2012 EddinsImages

I am quite pleased with the chair’s new versatility in our country home. In fact, it goes perfectly well with the little blue stool I painted with Annie Sloan paint earlier in the year…

Finished (for now!) vintage rocking chair and stool repainted with Annie Sloan Chalk Paint. © 2012 EddinsImages

All photos taken with iPhone 4. © 2012 EddinsImages

Dog Owner’s Best Purchase… Ever

12 Saturday May 2012

Posted by Claire Eddins in DIY, Favorite Products, Home and Garden, iPhoneography, Lifestyle, Pets

≈ 2 Comments

Tags

Andis AGC, clipper blades, Cool Care Plus, Dog, Dog grooming, dog grooming at home, dog grooming supplies, dog grooming tips, Groom, home pet care, Pet, pet care, Pet clipper, pet groomig supplies, pet supplies, Pets, professional clippers, Supplies

Mr. Snuggy, before his haircut. Doesn’t he look like he’s had enough of his messy coat? © 2012 EddinsImages

We have dogs. Lots of dogs. So many, in fact, that I will refrain from specifying the exact number. What I can say is that all, except one, were rescued… um, except for the puppies. But, that’s another story altogether. And, of course, we’ve got lots of other animals as well…

Lets just say my husband, son and I have morphed into a sort of private animal rescue league (yes, my husband is a saint).

Anyway, as it turns out, most of our dogs are breeds, or breed crosses, that require regular grooming. And that presents two problems: 1) Half of our dogs get car sick to and from the grooming salon, even the seasoned travelers; and, 2) Paying someone to wash and clip more than half a dozen dogs every few months can become both burdensome and pricey.

Finally, when a vet determined that we’d have to clip one of our chow chows regularly (to stave-off a recurring medical issue) we decided to bite the bullet. We purchased our own electric clippers. For less than $150 dollars – about the cost of just two professional groomings – we bought ourselves an Andis AGC clipper kit with detachable blades, plastic blade attachments, clipper oil and a carrying case. The packaging on the AGC clipper proclaimed it to be, “SUPER Duty. Great for the toughest grooming jobs. Thin to thick coat dogs, including heavily matted.”

That’s us!

Our Andis AGC electric clipper set and clipper blade spray. Despite our less-than-meticulous care and storage, the clipper has never failed to perform. © 2012 EddinsImages

Also, we purchased additional blades. In total, we have an Andis 10 UltraEdge 1.5mm blade, an Andis 7FC CeramicEdge 3.2mm blade, and an Oster 7F blade. Our final purchase was a spray can of Andis Cool Care Plus coolant/disinfectant/lubricant/cleaner/rust preventative. We’ve found the spray essential to use throughout each grooming to keep the working blades cool and lubricated and the dogs comfortable.

Time for a haircut. © 2012 EddinsImages

To be fair, I’m not altogether unfamiliar with clippers; owning more than two-dozen horses gets one accustomed to such things. However, the intricacies of grooming a dog is an entirely different animal than the broad swipes one makes clipping a big horse body.

Andis clipper works problem-free through thick, lamb-like fur. © 2012 EddinsImages

Certainly, there are grooming techniques, “dos and don’ts,” if you will, that professional dog groomers know and practice. My husband and I don’t have the slightest bit of training in such matters. However, we are extremely careful, especially when it comes to delicate pup face and neck areas. We’d rather be safe and less perfect than sorry. Same goes for anything we do with grooming scissors. The health, safety and comfort of our beloved pets is far more important than making them look even close to “show perfect.” I won’t begin to discuss the horror stories I’ve heard about grooming “mistakes,” even those made by licensed professionals.

Whenever we groom one of the dogs, there is at least one cat hanging out – rubbing, licking, purring – to show support for his or her comrade. © 2012 EddinsImages

Regardless of our dog-grooming ignorance, we’ve managed for the last year and a half or so to take all dog clipping matters into our own hands.

And, the results have been surprisingly good.

Feet and faces still need a bit of practice, both from the dogs and their neophyte groomers, but, each time we do it, we all get better and better at the process.  We don’t use a grooming table or any sort of restraint; in fact, our little maltipoo, Mr. Snuggy (who has a lamb-like thick, curly coat) has gotten so he just rolls over to “help” as we clip his underside. And, he always feels better after his grooming; for days and days, he is more playful, bright and affectionate after his haircut.

Mr. Snuggy always accommodates. © 2012 EddinsImages

Without a doubt, the Andis AGC clipper has been the very best pet-related purchase we’ve ever made.

And, I do believe the ceramic blade remains cooler than steel blades. The Andis clipper has paid for itself over and over again. It has plowed – without ever overheating, stopping, or injuring a dog – though dirty, matted, thick, undercoated chow chow hair; filthy, mud-clobbed, stick-tangled, poop-matted border collie fur; dreadlocked, twisted, matted and chewed-from-play maltipoo hair; and long, knotted maltipoo-beagle coats.  Often, there is so much matted hair, the process reminds me of the spring  sheep shearings I watched as a little girl

Is it lamb or maltipoo? © 2012 EddinsImages

Even so, our dogs don’t seem to mind the process nearly as much as they did the scary trip to the dog groomer. And, when it is all done, each dog always seems to appreciate his or her “new” coat. Especially Mr. Snuggy, who knows he’s a handsome fellow.

Mr Snuggy’s new haircut. © 2012 EddinsImages

Best of all, we’ve saved ourselves a pretty penny and the hassle of unpleasant car interior clean-ups during rides home from the professional grooming salon!

© 2012 EddinsImages

All photos taken with an iPhone 4. © 2012 EddinsImages

Introducing the Egg Cup

18 Wednesday Apr 2012

Posted by Claire Eddins in Favorite Products, Food, Home and Garden, iPhoneography, Kitchen and Table, Lifestyle

≈ Leave a comment

Tags

Boiled egg, Breakfast, Cloche, Cook, Cooking, Easter, Egg, Egg cup, Family traditions, Food, How to cook an egg, How to eat an egg, lifestyle, Pottery Barn, Soft boiled egg, Soft cooked egg, Tableware

The egg cup… hard to find in the United States these days. © 2012 EddinsImages

Part of my mission as a mom is to pass down arcane life skills and information to my son, so that when he’s a grown man, he will be fully prepared and confident to handle whatever surprises life throws at him. Of course, passing along esoteric, obscure, or old-fashioned skills most often goes hand-in-hand with passing along family stories and traditions.

So, it’s not all for nothing.

Before introducing the egg cup to my family… two soft-cooked eggs were chopped and  served in a bowl, the way Grandma did it. © 2012 EddinsImages

A few weeks ago, EGGS were on my mind. I don’t know why this was the time for eggs, maybe, because it was nearing the Easter holiday, a time when the media bombards us with bunnies, chicks and eggs. Regardless, I decided that my 13-year-old son needed to know how to prepare a soft-boiled egg (also called a soft-cooked egg). He could cook a scrambled egg, he could prepare an omelette, and he could fry an egg. However, he’d never learned to soft-boil an egg.

Let alone eat one.

And, I determined, if I was getting into soft-boiled eggs, I might as well get into egg cups. After all, you never know in life when you might meet-up with an egg cup. And, if you’ve never encountered one before, an uncracked egg sitting in an egg cup waiting to be eaten can be daunting.

Now, if you’re from the UK, or many parts of Europe where using an egg cup is more common, then, you may feel I’m a bit out of line for calling an egg cup “arcane.” However, the fact is, egg cups are few and far between here in the US.

Pottery Barn egg cup with attached saucer and bunny cameo cloche. © 2012 EddinsImages

So, about the time I began planning my egg tutorial, low-and-behold, Pottery Barn was having a sale… their spring catalogue featured the “Cameo Egg Cloche;” a white, glazed stoneware egg cup, with a little attached dish on the bottom, and a bunny “cameo” imprint on a separate cloche cover. Better still, each was on sale for less than six dollars. How could I go wrong? I ordered three, one for me, one for my husband, and one for my son. We’d make it a family affair, eating soft-boiled eggs out of our new egg cups.

Of course, even with the best-laid plans, nothing ever goes quite as expected. After the initial egg cup presentations were made to my family, when the  appointed day for egg cup lessons came to be, my husband was nowhere to be found.

I think, he hatched a plan to be away that day…

Son’s first crack at an egg in the cup. © 2012 EddinsImages

Regardless, my son showed a remarkable amount of patience and poise as he tolerated my soft-boiled egg and egg cup tutorials.

I told him stories about how, when I was a girl, I ate soft-boiled eggs at Grandma’s house. I remember Grandma’s early 20th-century kitchen, with the painted, sage-green cabinets, linoleum floor, enameled sink and drainboard, white gas-range, and her red transferware. Inside each transferware bowl was a depiction of a past-century couple under a tree.

Yummy, sloppy-good, soft-boiled egg. © 2012 EddinsImages

I’d watch Grandma boil the egg, cool it under running water – not for too long, just until cool enough to hold – then, hit the cooked shell with the back of a knife around the top before carefully removing the “lid.” Next, with a teaspoon, in one motion, she’d carefully scoop-out the egg from the shell (like magic, I thought), and place the loosened egg in the transferware bowl. My egg would be chopped with a spoon, before salted and peppered. I daresay, there would be a pat of butter added as well. Sometimes, there would be toast with butter and jelly on the side. I’d eat my delicious egg, whites cooked, yolk still partially runny, until I reached the bottom of the bowl where I’d discover the garden scene. Grandma ate hers with little pieces of buttered toast mixed in with the runny egg. When we finished, Grandma and I would make-up a story about the garden couple in the bottom of the bowl.

Inside the egg…  © 2012 EddinsImages

However, even after years of eating soft-boiled eggs with Grandma, I’d never eaten an egg from an egg cup. So, the polite and practical use of  the egg cup was something my son and I learned together last week. To cook and serve:

  1. We started by placing an egg in cold water inside a saucepan.
  2. Then, we heated the pan until the water came to a full boil.
  3. After two to three minutes, we removed the egg with a slotted spoon and cooled the egg under running cool water… just until it was cool enough to touch (still quite warm).
  4. Then, we placed the egg into the egg cup.
  5. Using the back of a knife, we hit the top side of the egg-shell with a sharp rap to crack the shell.
  6. We followed by pushing the knife tip into the egg and slicing across the top, until the “lid” fell off to reveal the interior of the egg. Our first peek inside… here’s where we learned whether we’d gotten it right in terms of cooking time! We concluded that I prefer my egg slightly runny and my son prefers his egg cooked a little closer to hard-boiled, so we needed to adjust cooking and cooling times appropriately.

All that was left to do was season the egg interior with salt and pepper (if desired), carefully dip the spoon in (so as not to slosh out all the egg on the first bite)… and enjoy! Dipping slivers of toast made from my pumpkin bread was a tasty treat as well.

Dipping toasted pumpkin bread was “eggstra” delicious! Eddins Images

Ummm… we won’t mention here that if one finds his or her egg to be slightly undercooked, and if one decides to put the egg with “lid” removed but still in the shell,  into the microwave for a few additional seconds, then perhaps, when one finally inserts his or her spoon into the boiled-then-microwaved egg… there will be an EGGSPLOSION.

Don’t do that.

<grin>

So, after a few days and a dozen eggs or so, armed with a bit of new arcane knowledge and skill, my son is ready to take-on a world full of eggs and egg cups.

Now, we just need to find some egg spoons…

Son’s first egg-cupped egg… all gone! Eddins Images

Some of What I’ve Learned about Egg Cups:

  • An egg cup is little dish or bowl specifically designed to serve a boiled or cooked egg.
  • Most egg cups are single cups on a pedestal. However, a double egg cup may have two sides, one large and one small.
  • Using a double egg cup, place the large end over the unopened egg to keep the egg warm until it is time to eat. Then, flip over the cup and set the egg into the smaller cup for consummation.
  • During the 1930s, the double egg cup was especially popular; egg was removed from the shell, placed in the big cup, chopped and seasoned with salt and pepper and then eaten right from the big cup.
  • Toast or bread, often sliced into narrow “fingers” dipped into the egg is a favorite treat.
  • The egg sits with its larger end in the egg cup.
  • A special egg cutter (ACK! who has one of those?) can be used to break open the shell.
  • An egg spoon is made to fit into the egg.
  • Egg cups are most common in the UK, Europe and Canada. Less common in the US.
  • Art depicting egg cups dates as early as 3AD. Actual egg cups were found in ruins of Pompeii dating from 79AD.
  • Prior to 1700, egg cups were made from wood then silver.
  • An egg cup may be made of just about any material, form porcelain, to plastic.
  • In the 1700s, French citizens purchased egg cups to copy King Louis XV, as he supposedly could “decapitate an egg at a single stroke.”
  • Often, 1800s egg cups made of silver were gilded inside to prevent sulfur from the egg from staining silver and affecting flavor.
  • 1800s egg spoons were often made of horn, bone or ivory so as not to taint the egg taste.
  • Beginning in the 1930s, egg cups with attached platters were made.
  • People collect egg cups all over the world. Egg cup collecting is called pocillovy. An egg collector is known as a pocillovist.

All photos taken with an iPhone 4. © 2012 EddinsImages

Recent Posts

  • Beloved, Award-winning Toy
  • Buddha Toad
  • Mighty Mushroom
  • Rainbows and Green Orbs
  • Swimmy Summer Fun Photo

Archives

Pages

  • About

Enter your email address to follow this blog and receive notifications of new posts by email.

Join 20 other subscribers

Goodreads

Blog at WordPress.com.

  • Follow Following
    • Reinventing Claire
    • Already have a WordPress.com account? Log in now.
    • Reinventing Claire
    • Customize
    • Follow Following
    • Sign up
    • Log in
    • Report this content
    • View site in Reader
    • Manage subscriptions
    • Collapse this bar
 

Loading Comments...